Android
一、集成环境规范
1、JDK
需要JDK 1.8版本。JDK1.8下载
2、Android SDK
从官网下载最新的SDK安装包即可。AndroidSDK下载
这一项可以不下载,选择安装带有SDK包的Android Studio即可。
3、Gradle
需要4.10版本。Gradle4.10下载
4、Android Studio
最小3.0。Android Studio3.2下载
二、Android Studio集成环境配置
1、SDK、JDK指定
打开Android Studio,点击File->Project Structure,如下图所示:
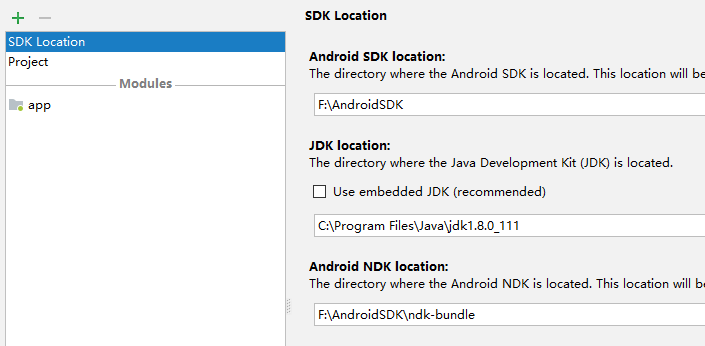
图1
可在此页指定Android SDK,JDK版本。
2、Gradle指定
1)、Gradle版本指定
打开Android Studio,点击File->Settings->Build,Execution,Deployment选项卡,如图所示:
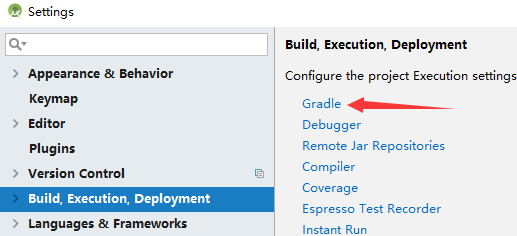
图2
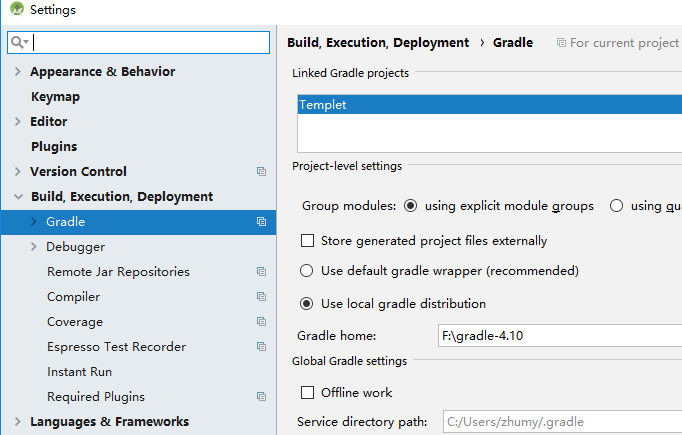
图3
点击gradle选项,打开gradle配置页,在Gradle home中配置指定的gradle版本。注意:这里需要配置解压缩第一章中下载下来的gradle压缩包,这个地址就是指向那个解压缩包的位置。
2)、Gradle Android Build Tool插件版本指定
平台集成使用的是3.0.1版本的build tool插件。打开project根目录下的build.gradle。配置build tool版本:
// Top-level build file where you can add configuration options common to all sub-projects/modules.
buildscript {
    repositories {
        maven {url 'http://maven.aliyun.com/nexus/content/groups/public/'}
        maven {url 'http://maven.aliyun.com/nexus/content/repositories/jcenter'}
        flatDir dirs: 'app'
    }
    dependencies {
        classpath ':proguard-5.3.2'
        classpath 'com.android.tools.build:gradle:3.0.1'  //在这里配置build tool版本
    }
}

allprojects {
    repositories {
        maven {url 'http://maven.aliyun.com/nexus/content/groups/public/'}
        maven {url 'http://maven.aliyun.com/nexus/content/repositories/jcenter'}
    }
}
|
3)、混淆方案指定
版本不限制,但是需要使用本地jar包,用法如上一段gradle脚本中第9行所示。下载下来的混淆jar包放在project/app目录下。
三、三方依赖库本地化方案
由于客户自定义的模板工程是放在公司的内网集成环境里,因此,除了我们平台自身提供的编译环境的相关缓存之外。对于客户自己项目依赖的三方库是没有缓存的,因此,对于三方依赖库本地化的要求变得必须。这里提供一套本地化处理方案供大家参考。
1、查看工程依赖库
打开Android Studio,切换底部工具栏到Terminal标签卡,在Terminal中执行:
- gradlew androidDependencies >projectDependencies.txt
执行完后,可在当前project的根目录下,找到projectDependencies.txt文件,这个文件列出的正式这个工程当前的所有依赖项。但是值得注意的是,这一份依赖列表包含了所有编译任务涉及到的库,举例说明,假如您的工程是使用prdRelease任务进行出包的,那么在生成的依赖树列表中,查找prdRelease即可,其中prdReleaseCompileClasspath这一项就是我们需要的。下面是依赖树表举例:
prdRelease
prdReleaseCompileClasspath - Dependencies for compilation
+--- F:\LightGMU2.1_GIT\Templet\libs\commons-net-3.3.jar
……
+--- com.android.support:multidex:1.0.3@aar
+--- com.google.code.gson:gson:2.2.4@jar
+--- com.hundsun2:gmubase:1.5.0@aar
+--- com.android.support:preference-v7:26.1.0@aar
……
+--- android.arch.lifecycle:common:1.0.0@jar
\--- android.arch.core:common:1.0.0@jar
|
第3行是对本地jar包的依赖,第5-10行都是远程依赖项,但是这里的远程指的不是网络,而是指任何不在此项目工程目录里的。所有+号表示直接依赖,\表示间接依赖,因此如果要将三方依赖本地化,列表中所有的库都需要下载到本地才行。
2、下载依赖库
根据上一节获取到的依赖树列表,其中访问网络远程maven仓库的,可以从[Maven仓库]通过搜索group名进行查找下载。而依赖树列表中所有group名为com.hundsun2的组件均为Light组件包,需要访问[研发中心产品下载服务-Light]根据自己需求的发布版本进行下载。
注意:[Maven仓库]中有部分库需要翻墙才能访问
四、集成到Light平台的规范
1、Android资源位置
凡事集成到Light平台打包的模板工程,都是使用平台打包脚本进行编译的,因此,对于一些编译时需要使用到的文件,资源所在位置有着严格的要求。请务必遵守这样的目录结构规范:(注:打星号的文件夹为必须创建,且必须置于此处的)
├─app
│  ├─assets *
│  │  ├─gmu  *
│  │  │  └─gmu_icon
│  │  └─www
│  ├─res  *
│  │  ├─anim
│  │  ├─drawable  *
│  │  ├─drawable-hdpi  *
│  │  ├─drawable-sw360dp-h640dp-xxhdpi  *
│  │  ├─drawable-sw360dp-h720dp-xxhdpi  *
│  │  ├─drawable-v24  *
│  │  ├─drawable-xhdpi  *
│  │  ├─drawable-xxhdpi  *
│  │  ├─layout
│  │  ├─layout-anydpi
│  │  ├─mipmap-hdpi  *
│  │  ├─mipmap-mdpi  *
│  │  ├─mipmap-xhdpi  *
│  │  ├─mipmap-xxhdpi  *
│  │  ├─mipmap-xxxhdpi  *
│  │  ├─values
│  │  └─xml
│  ├─info.xml *
│  ├─pkglist.json *
│  └─src
└─libs  *
|   └─hundsun  *
├─AndroidManifest.xml
└─androidLight.keystore
|
首先,assets、res、AndroidManifest、androidLight.keystore签名文件、info.xml都必须放在project/app/目录下,引用的三方库都存放在libs文件夹下。libs文件夹是放在project根目录下的与app目录平级。并且必须在其内部创建hundsun文件夹,用来存放Light组件包。
drawable与mipmap文件夹主要是平台打包脚本需要替换应用的启动图,图标,会自动向各个分辨率的文件夹拷贝,因此需要按照要求创建。这些文件夹内可以不用都放上图片,只要有文件夹即可。
这里要特别说明一下,签名文件的名字必须为androidLight.keystore。info.xml文件内配置包名,应用名,版本号,已经签名证书的别名,秘钥库密码,秘钥密码,详细介绍查看[四、2、5)]
Light组件依赖规范详细介绍查看[四、3]
2、gradle脚本编写规范
注:一切以Light发布平台提供的标准模板工程内的app/build.gradle为基准,此文档内的只是片面摘抄择选举例用,直接拷贝未必能编译通过请悉知。
1)、sdk版本
平台的target
sdk为28,编译sdk为28,编译工具使用28.0.3最小sdk为15。这些是平台默认缓存环境,设置成其他版本无法在平台上编译通过。
2)、assemblePrd task
平台打包脚本会自动调用assemblePrd任务,因此请您在project/app/build.gradle脚本内,务必添加这样一项task,添加方法如下所示:
android {
    ......
    productFlavors {
        prd {
            resValue "string", "hscloudServerHost", "https://light.hscloud.cn"
            resValue "string", "applogColloctor", "https://api.lightyy.com"
            resValue "string", "lightApiServer", "https://api.lightyy.com"
        }
    }
}
|
3)、重定向资源路径
上一节中提到,模板工程的资源路径与标准android项目并不同,因此在切换了资源路径后,需要在app/build.gradle中声明,写法如下:
android {
    useLibrary 'org.apache.http.legacy'
    compileSdkVersion 28
    buildToolsVersion '28.0.3'

    repositories {
        flatDir {
            dirs '../libs'  //指定jar包读取位置
        }
    }

    sourceSets {
        main {  //指定assets、AndroidManifest、res位置
            manifest.srcFile 'AndroidManifest.xml'
            java.srcDirs = ['src']
            resources.srcDirs = ['src']
            aidl.srcDirs = ['src']
            renderscript.srcDirs = ['src']
            res.srcDirs = ['res']
            assets.srcDirs = ['assets']
            jniLibs.srcDirs = ['libs']
        }
		hopes {
            res.srcDirs = ['products/hopes/res']
        }
        debug.setRoot('build-types/debug')
        release.setRoot('build-types/release')
    }
}
|
4)、apk生成路径指定
使用平台打包后,最后会直接在网页上提供出下载apk的二维码。因此需要您将apk编译到指定目录,平台脚本才能获取得到,设置方法如下:
android {
    ......
    applicationVariants.all { variant ->
        variant.outputs.all {
            //指定apk输出路径
            variant.getPackageApplication().outputDirectory = new File(project.rootDir.absolutePath + "/app/build/outputs/apk")
            String dateString = new Date().format('yyyyMMdd_HHmmss')
            def outputApkFileName = "${android.defaultConfig.applicationId}_V${android.defaultConfig.versionName}"
            if (variant.buildType.name.equals('release')) {
                outputApkFileName = "${outputApkFileName}_${dateString}_release.apk"
            }else if (variant.buildType.name.equals('debug')) {
                outputApkFileName = "${outputApkFileName}_debug.apk"
            }
            outputFileName = outputApkFileName
        }
    }
    ......
}
|
5)、包名,签名、应用名、应用版本号设置
a、info.xml
在app/目录下新建info.xml。该配置文件的作用是将平台上的应用参数设置到模板工程中。为此还需要在project/app/build.gradle中添加读取info.xml配置文件的操作。所以即使平台会自动生成该文件,但在本地您仍然需要配合修改gradle以及添加info.xml。info.xml大致格式如下:
<?xml version="1.0" encoding="UTF-8"?>
<appInfo>
    <appInfo>
        <title>应用名</title>
        <version>应用版本号</version>
        <appid>工程包名</appid>
        <scheme>跨应用跳转协议头</scheme>
        <cert>
            <alias>证书别名</alias>
            <libpwd>访问秘钥库的密码</libpwd>
            <certpwd>访问秘钥的密码</certpwd>
        </cert>
    </appInfo>
</appInfo>
|
b、app/build.gradle中的配置
  android {
    ......
    defaultConfig {
        ......
        File infoFile = new File(rootProject.getRootDir().getAbsolutePath()+"/app/info.xml")
        if(infoFile.exists())
        {
            def infoFileContent = new XmlParser().parse(infoFile)
            if(infoFileContent.appInfo.lightAppid){
                String lightAppid = infoFileContent.appInfo.lightAppid.text();
                //resValue为defaultConfig类中的对象,因此只能放在这里不要拿到外面处理,会编译失败。
                resValue "string", "lightAppid", lightAppid
            }else{
                resValue "string", "lightAppid", ""
            }
        }else{
            resValue "string", "lightAppid", ""
        }
        ......
    }
    ......
    signingConfigs {
        release {
            storeFile file("android_qii.keystore")
            keyAlias "android_qii.keystore"
            keyPassword "qii60057"
            storePassword "qii60057"
        }
    }

    File f = new File(rootProject.getRootDir().getAbsolutePath()+"/app/info.xml")
    if(f.exists())
    {
        def appInfo = new XmlParser().parse(f)
        android.defaultConfig.applicationId = appInfo.appInfo.appid.text()
        android.defaultConfig.manifestPlaceholders.package = appInfo.appInfo.appid.text()
        android.defaultConfig.manifestPlaceholders.label = appInfo.appInfo.title.text()
        android.defaultConfig.versionName = appInfo.appInfo.version.text()
        android.defaultConfig.manifestPlaceholders.appScheme=appInfo.appInfo.URLScheme.text()
        if (appInfo.appInfo.cert) {
            android.signingConfigs.release.keyAlias = appInfo.appInfo.cert.alias.text()
            android.signingConfigs.release.keyPassword = appInfo.appInfo.cert.certpwd.text()
            android.signingConfigs.release.storePassword = appInfo.appInfo.cert.libpwd.text()
        }
    }

    //signsha1.txt文件用于校验签名一致性用,内容为证书的sha1值,更换签名证书后记得更换这里的数据,否则将导致应用签名
    // 一致性校验不通过无法启动,利用平台打包,会自动创建signsha1.txt,不需要自己添加。
    File signf = new File(rootProject.getRootDir().getAbsolutePath()+"/app/signsha1.txt")
    if(signf.exists()){
        String str = signf.getText("UTF-8")
        android.defaultConfig.manifestPlaceholders.SIGN_SHA1 = str
    }else{
        android.defaultConfig.manifestPlaceholders.SIGN_SHA1 = ""
    }
    ......
}
|
6)、依赖与删除依赖aar
依赖aar包的写法:implementation为gradle build-tool 3.+以后支持的语法,其作用与compile一致。
implementation(name:'hundsun/gmubase',ext:'aar')
|
依赖jar包的写法:
implementation files('../libs/BaiduLBS_Android.jar')
|
依赖Project中的modules的写法:
implementation project(':megmu')
|
删除依赖就是找到当时在gradle中依赖的语句删掉。
3、Light组件依赖规范
1)、放置位置
必须置于project/libs/hundsun下。因为放在平台上打包,在替换新的组件包时,只更新此处Light相关的组件包。
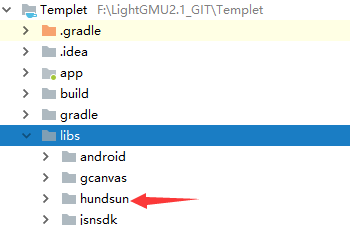
图4
2)、命名规范
去掉版本号,只留组件名。示例:
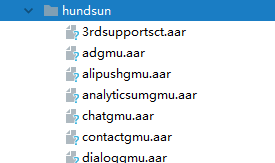
图5
3)、动态依赖原则
为了缩减APK包大小,使用Light平台打包,将使用动态依赖的方式添加依赖库。pkglist.json中声明gmu名称和组件包名称的映射关系,用户在Light平台发起集成时需要上传配置包,集成服务会根据配置包中的gmu文件和模版工程中声明的映射关系来决定app会包含哪些组件包。pkglist.json文件格式示例
{
   "web":{
    "name":"web容器",
    "android_pkg":"webgmu",
    "ios_pkg":"WebGMU",
    "description":"该组件提供前端以支持打开H5页面",
    "jsapi" : [
        {
            "module": "native",
            "name": "本地接口"
        },
        {
            "module": "head",
            "name": "导航栏控制接口"
        }
    ]
	}
}
|
iOS
标准模版工程是集成服务提供的默认模版工程。
目录结构
.
│   Template.xcodeproj
│   Template.xcconfig
│   pkglist.json
└───Template
│   │   AppDelegate.h
│   │   AppDelegate.m
│   │   Info.plist
│   │   main.m
│   │   Template.entitlements
│   └───Assets.xcassets
│   │   │   Contents.json
│   │   └───AppIcon.appiconset
│   │   │   │   Contents.json
│   │   │   │   AppIcon20x20@2x.png
│   │   │   │   ...
│   │   │
│   │   └───LaunchImage.launchimage
│   │       │   Contents.json
│   │       │   LaunchImage-700-568h@2x.png
│   │       │   ...
│   │
│   └───Resources
|       |   LIGHT_LICENSE
│       └───assets
│       └───gmu
│       └───stream
│       └───www
└───Vendors
    └───A
    └───B
|
用户如果有定制化需求,如修改启动流程等,可以在标准模版工程的基础上自定义。